Battery switch on travel trailer function is crucial for managing your RV’s power. This seemingly simple switch controls the flow of electricity between your house battery (powering appliances) and your vehicle’s starting battery. Understanding its operation is key to preventing dead batteries, maximizing power efficiency, and avoiding costly repairs. We’ll explore different switch types, troubleshooting tips, installation advice, and safety precautions to ensure you’re confident handling your travel trailer’s electrical system.
This guide covers everything from the basic mechanics of different battery switch types to advanced troubleshooting techniques and safe installation practices. We’ll delve into how your battery switch interacts with alternative power sources like solar panels and generators, optimizing your energy usage on the road. By the end, you’ll have a comprehensive understanding of how to keep your travel trailer’s electrical system running smoothly and safely.
Battery Switch Types in Travel Trailers: Battery Switch On Travel Trailer Function

Choosing the right battery switch for your travel trailer is crucial for managing power and preventing electrical issues. Understanding the different types available will help you make an informed decision based on your needs and budget. This section details the common types, their workings, and their respective pros and cons.
Single-Pole Battery Switches
A single-pole battery switch is the simplest type. It’s essentially a single switch that controls the connection between your battery and the trailer’s electrical system. Think of it like a light switch; it’s either on or off. Internally, it’s a simple mechanism: a lever or button that moves a conductor to make or break the circuit. A diagram would show a single lever connected to a single contact point, with the battery on one side and the trailer’s electrical system on the other.
The advantage is its simplicity and low cost. However, it only allows for connecting or disconnecting the battery; no additional control over separate systems is possible. Maintenance is minimal, usually just checking for corrosion on the terminals.
Double-Pole Battery Switches
A double-pole switch offers more control. It simultaneously controls two circuits, usually the positive and negative terminals of the battery. This is a significant safety improvement, as disconnecting both terminals prevents accidental shorts. Internally, it operates similarly to a single-pole switch, but with two independent switches working in unison. A diagram would illustrate two separate levers or buttons, each controlling a separate circuit (positive and negative), both activating simultaneously.
The benefit is improved safety and the ability to completely isolate the battery. The cost is slightly higher than a single-pole switch, but the increased safety makes it a worthwhile investment. Maintenance remains simple.
Double-Pole Double-Throw (DPDT) Battery Switches
The DPDT switch is the most versatile option. It allows you to switch between two different power sources (e.g., your house battery and a shore power connection) or even connect to both simultaneously. Internally, it’s more complex, involving multiple contacts and a more intricate switching mechanism. A diagram would show a lever or selector switch with three positions: one for each battery and a third for disconnecting both.
This type provides the greatest flexibility, enabling seamless switching between different power sources, but it’s also the most expensive and slightly more complex to install and maintain.
| Feature | Single-Pole | Double-Pole | Double-Pole Double-Throw (DPDT) |
|---|---|---|---|
| Number of Circuits Controlled | One | Two (positive and negative) | Two or more, selectable |
| Internal Mechanism | Simple on/off switch | Two independent on/off switches | Multiple contacts, selector switch |
| Cost | Low | Medium | High |
| Maintenance | Low | Low | Moderate |
| Safety | Moderate | High | High |
| Versatility | Low | Medium | High |
Understanding Battery Switch Functionality
A battery switch in your travel trailer is a crucial component that controls the flow of power between your house batteries (powering the interior lights, appliances, etc.) and your vehicle’s starting battery (used to crank the engine). It’s essential for managing power efficiently and protecting your batteries.The battery switch acts as a gatekeeper, selectively connecting or disconnecting your house batteries from the vehicle’s electrical system.
This control is vital for preventing unwanted battery drain, ensuring you have enough power for starting your tow vehicle, and extending the lifespan of your batteries.
Battery Switch Power Management, Battery switch on travel trailer function
The primary function is to isolate the house batteries from the starting battery when the trailer is not in use. This prevents parasitic drain, a slow but constant discharge of your house batteries caused by small electrical loads like clocks or detectors, even when the trailer is disconnected from shore power. With the switch in the “off” position, the house batteries are completely disconnected, preventing this drain.
When you want to use the trailer’s systems, the switch connects the house batteries to the vehicle’s charging system or shore power. Proper management prevents situations like finding a dead house battery when you need to use your trailer.
Battery Switch and Parasitic Drain Prevention
Parasitic drain is a common problem in travel trailers. Even small devices left on can slowly deplete your batteries over time, leaving you stranded. The battery switch offers a simple solution. By switching to the “off” position when not in use, you effectively eliminate the possibility of parasitic drain, thus preserving your battery power for when you actually need it.
Imagine leaving a small light on – it might seem insignificant, but over a week, it could drain your house battery significantly. The switch prevents this.
Safe Battery Switch Operation
Before operating the switch, always ensure that you understand the positions and their implications. Most switches have three positions: “Off,” “Battery,” and “Both.”
- Off: Completely disconnects the house batteries from all other systems, preventing parasitic drain. This is the ideal position when storing the trailer or when not using it for an extended period.
- Battery: Connects only the house batteries to the charging system of the tow vehicle or shore power. This allows you to charge the house batteries independently.
- Both: Connects both the house and starting batteries together. This allows the starting battery to power the house system and vice versa (usually only used for emergency situations, and is not recommended for prolonged periods).
Always turn the switch to the “Off” position before disconnecting the trailer from your tow vehicle. This prevents any accidental drain from the house batteries and ensures your tow vehicle’s battery is ready to start the engine. Before connecting to shore power, ensure the switch is in the appropriate position to charge your batteries effectively. Incorrect operation can lead to unexpected battery drain or damage.
Troubleshooting Common Battery Switch Issues
Your travel trailer’s battery switch is a crucial component, ensuring power flows correctly to your appliances and systems. Problems with this switch can leave you stranded without lights, refrigeration, or other essential functions. Understanding how to diagnose and fix common issues can save you time, frustration, and potential repair costs.
Battery switch malfunctions often stem from simple, easily fixable problems. However, overlooking these issues can lead to more significant problems down the road. Let’s explore some common causes of battery switch failures and how to effectively troubleshoot them.
Common Battery Switch Problems
Several factors can cause your travel trailer’s battery switch to malfunction. These typically involve either a physical issue with the switch itself or a problem with the connections. Corrosion is a major culprit, often caused by exposure to moisture and the natural chemical reactions within the battery system. Loose connections, whether due to vibration or improper installation, can also interrupt the electrical flow.
So, you’re planning a trip? Awesome! Don’t forget travel insurance; it’s a lifesaver. Check out aon travel insurance for comprehensive coverage. They offer various plans, so you can find one that fits your budget and travel style. And if you’re looking for a different provider with similar options, aon travel insurance is another great resource to compare prices and features.
Seriously, securing your trip with good insurance is key to a stress-free adventure.
Finally, the switch itself may simply fail due to age or overuse.
Diagnosing a Malfunctioning Battery Switch
Before you start replacing parts, systematically diagnose the problem. A visual inspection is the first step. Look closely at the switch for any signs of corrosion, particularly around the terminals. Check for any loose wires or connections. A loose connection might be obvious, but sometimes corrosion hides beneath a layer of grime.
If you see corrosion, that’s a prime suspect. Next, use a multimeter to test the voltage at various points in the circuit. Check the voltage at the battery terminals, then at the input and output terminals of the switch. A significant voltage drop across the switch indicates a problem within the switch itself or a bad connection.
So, you’re planning a trip? Awesome! Don’t forget travel insurance; it’s a lifesaver. Check out Aon travel insurance for comprehensive coverage. They offer various plans, so finding the right fit for your adventure shouldn’t be a hassle. And if you’re looking for another option, comparing prices is always smart.
You might find a better deal with Aon travel insurance – they often have special offers, especially for longer trips. Remember to read the fine print before you commit!
Cleaning and Maintaining Your Battery Switch
Regular cleaning and maintenance are key to preventing battery switch issues. Start by disconnecting the battery cables – always disconnect the negative (-) cable first. Then, use a wire brush or sandpaper to clean the terminals, removing any corrosion or buildup. Apply a corrosion inhibitor or dielectric grease to the cleaned terminals to prevent future corrosion. Tighten all connections securely, ensuring a good electrical contact.
Finally, reconnect the battery cables, making sure they are firmly attached.
Troubleshooting Flowchart
This flowchart provides a step-by-step guide to troubleshooting a non-functional battery switch:
[Imagine a flowchart here. The flowchart would begin with “Battery Switch Not Working?” A “Yes” branch would lead to “Visual Inspection (Corrosion, Loose Connections?)”. A “Yes” branch from this would lead to “Clean and Tighten Connections”. A “No” branch from “Visual Inspection” would lead to “Voltage Test (Battery, Switch Input/Output)”. A “Low Voltage” result would lead to “Replace Battery Switch”.
A “No” result from “Low Voltage” would lead to “Check Wiring for Breaks”. A “No” from the initial question would lead to “Check other systems”. All “Clean and Tighten Connections”, “Replace Battery Switch”, and “Check Wiring for Breaks” would have a “Test Battery Switch” step leading back to the beginning.]
Battery Switch Installation and Wiring
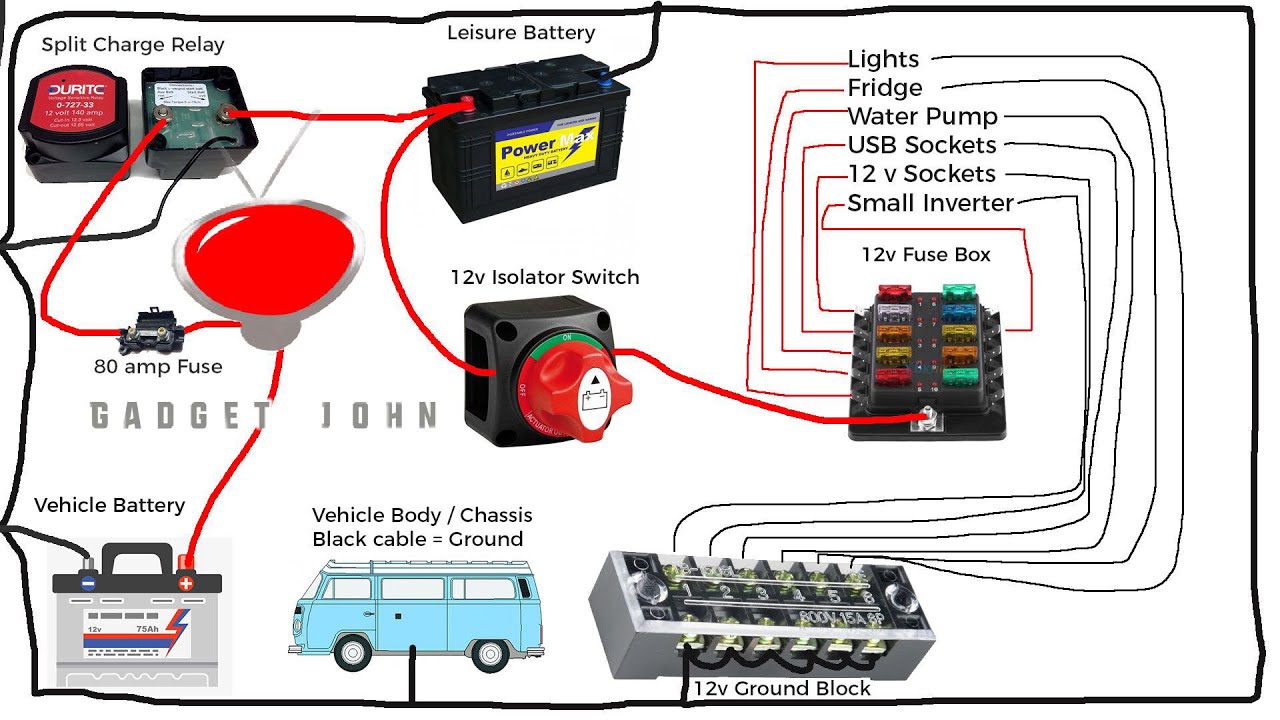
Installing a new battery switch in your travel trailer is a moderately challenging DIY project that can significantly improve your RV’s electrical system. Proper installation ensures safe and reliable power distribution to your appliances and accessories. This section details the process, necessary tools, and wiring considerations for a successful installation.
Necessary Tools and Materials
Gathering the correct tools and materials beforehand ensures a smooth installation process. A poorly equipped workspace can lead to delays and potential frustration.
- New battery switch (choose the appropriate amperage rating for your system)
- Appropriate gauge wiring (consult your battery’s specifications and the switch’s amperage rating)
- Wire connectors (crimp-on connectors are recommended for secure and reliable connections)
- Wire strippers/cutters
- Crimping tool
- Screwdrivers (Phillips and flathead)
- Wrench (size appropriate for battery terminals)
- Voltmeter (for testing connections)
- Fuses (appropriate amperage rating for each circuit)
- Fuse holders
- Heat shrink tubing (for added protection on wire connections)
- Electrical tape (for additional insulation)
- Safety glasses
- Gloves
Step-by-Step Installation Guide
Following these steps ensures a safe and functional battery switch installation. Remember to disconnect the negative battery terminal before beginning any work.
- Locate Installation Point: Choose a secure and accessible location for the battery switch, ideally close to the batteries but protected from the elements.
- Prepare Wiring: Cut and strip the appropriate length of wiring needed to connect the battery switch to the batteries and the main power distribution panel. Use the correct gauge wire based on the amperage requirements of your system. Always err on the side of caution and use a heavier gauge if uncertain.
- Connect Battery Cables: Connect one end of the appropriately sized positive cable to the positive (+) terminal of the battery. Connect the other end to the positive (+) input terminal on the battery switch. Repeat this process for the negative (-) cable, connecting it to the negative (-) terminal of the battery and the negative (-) input terminal on the switch.
- Connect to Power Distribution Panel: Connect the output terminals of the battery switch to your travel trailer’s main power distribution panel. This typically involves connecting the positive (+) output to the positive (+) bus bar and the negative (-) output to the negative (-) bus bar within the panel. Ensure proper connections and use appropriate wire connectors.
- Fuse Protection: Install inline fuses in both the positive (+) and negative (-) lines leading from the battery to the switch. These fuses provide critical protection in case of a short circuit, preventing damage to the wiring and the battery switch itself. The fuse rating should be appropriate for the amperage rating of the switch and the wiring.
- Secure Wiring: Secure all wiring using appropriate cable clamps and ties. This prevents the wires from moving around and causing shorts or damage.
- Test the Installation: After completing the wiring, reconnect the negative battery terminal and use a voltmeter to check the voltage at various points in the system to ensure proper connections and voltage readings.
Wiring Diagram Example
A simple wiring diagram is crucial for understanding the connections. Imagine a diagram showing the battery’s positive terminal connected via a fuse to the positive input of the battery switch. The battery’s negative terminal is similarly connected via a fuse to the negative input of the switch. The positive output of the switch then connects, via another fuse, to the positive bus bar of the power distribution panel.
The negative output of the switch similarly connects to the negative bus bar. Each connection should be clearly labeled. This ensures clear understanding of the circuit’s flow.
Mastering your travel trailer’s battery switch is a vital skill for any RVer. From choosing the right switch type for your needs to performing basic maintenance and troubleshooting, this guide provides a practical roadmap to confident power management. Remember safety is paramount—always disconnect power before working on your electrical system. By understanding the function and proper use of your battery switch, you’ll enjoy more reliable power and peace of mind on your adventures.
Key Questions Answered
What happens if my battery switch is faulty?
A faulty switch can lead to dead batteries, power outages, or even electrical fires. Symptoms include no power to appliances, inability to start the vehicle, or unusual electrical behavior.
How often should I clean my battery switch?
At least once a year, or more often if you notice corrosion or poor connections. Regular cleaning prevents issues and ensures proper power flow.
Can I use a battery switch from a different RV?
Potentially, but ensure it’s the correct amperage rating for your system and wired correctly. Using an incorrect switch could damage your electrical system.
What size fuse should I use with my battery switch?
The fuse size depends on the amperage rating of your battery switch and the total amperage draw of your system. Check your switch’s specifications for the recommended fuse size.
